Early Photography
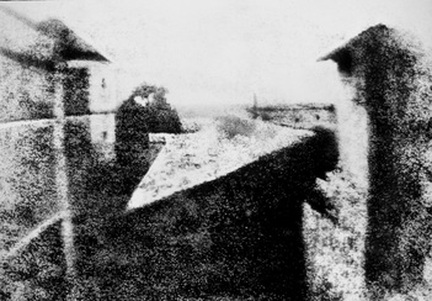
Photography was invented in 1826 by Joseph Nicéphore Niépce a french inventor, the photo above is the first known photo taken. But photography was thought of a long time before that in 5th and 4th BC Greek mathematicians Aristotle and Euclid used used a type of camera obscura in their experiments. They used it to draw the projected images. The first photo taken by Joseph Nicéphore Niépce used a polished pewter plate covered with a petroleum derivative called bitumen of Judea which captured light. This was the most popular method of getting photo's taken but the photo could easily rubbed off. But after Talbot had invented the calotype process. He coated paper sheets with silver chloride to create an intermediate negative image. Unlike a daguerreotype, a calotype negative could be used to reproduce positive prints, like most chemical films do today.
Photography was invented in 1826 by Joseph Nicéphore Niépce a french inventor, the photo above is the first known photo taken. But photography was thought of a long time before that in 5th and 4th BC Greek mathematicians Aristotle and Euclid used used a type of camera obscura in their experiments. They used it to draw the projected images. The first photo taken by Joseph Nicéphore Niépce used a polished pewter plate covered with a petroleum derivative called bitumen of Judea which captured light. This was the most popular method of getting photo's taken but the photo could easily rubbed off. But after Talbot had invented the calotype process. He coated paper sheets with silver chloride to create an intermediate negative image. Unlike a daguerreotype, a calotype negative could be used to reproduce positive prints, like most chemical films do today.
Lucida and the Obscure camera's
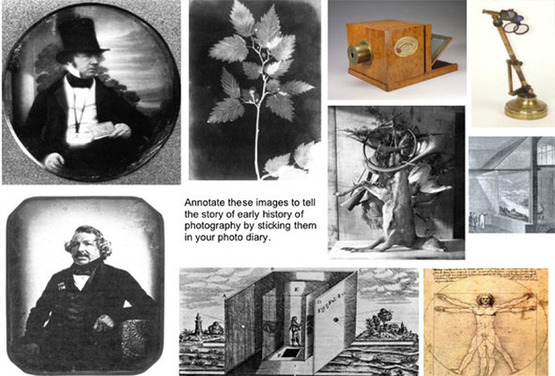
A camera obscura is an optical device that projects an image of its surroundings on a screen. The camera obscura was invented in around 470 to 390 BCE by Mozi, who was a Chinese philosopher. He called his device a "collecting plate" or a "locked treasure room"
The camera Lucida was a more portable version of the camera obscura, but they both project light onto a surface. where the artist can the draw the image.
In 1840, Talbot had invented the calotype camera which printed an image onto a piece of paper and could produce many prints, which gave it the upper hand over the daguerreotype as that could only produce one print. But at the beginning the photo's produced by daguerreotype where sharper and better quality so people choose to use that method but as Talbot experimented using different chemicals his photo's became better quality and sharper and this is the method we now use to this very day.
Photograms

Here is an example of a photogram, it was used as a test strip to see how long to expose the photographic paper for. I used a piece of cardboard to cover up parts of the paper so it would not be exposed, and after every 2 seconds I moved it down a section. So i can see how long to expose the hole thing for. I decided to expose the paper for 6 seconds, as I would get a clear image with a solid black background. Below are some examples of me using the photogram technique.
photogram 1:
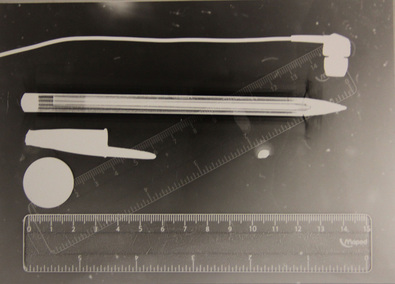
Here was my first try at using the photogram technique, i laid out some objects such as earphones, a Bic pen, a coin and a ruler. I flashed the light for 3 seconds then moved the ruler and flashed it again for another 3 seconds so the ruler would appear to move. I like this image as they are laid out as if they where getting measured. Also the double exposure look very interesting in this photo. In my next photogram i shall used more objects like the ruler and the pen as they allow a little light through and it creates a cool effect.
Photogram 2:
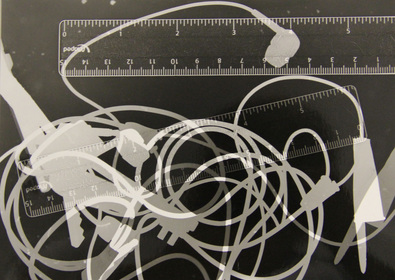
Here is my second photogram, in this photogram I also used the double exposure technique and moved all the objects not just one. I like it as some of the earphone cable is lighter then the rest this also goes for the pen and keys. It makes a cool effect, I exposed the image for 4 seconds this time and then moved the objects and exposed it for another 4 seconds.
Photogram 3:
We had to create letters with object we found around the room. I was given D,E and F so I decided to use my highlighters and a ruler and some masking tape. i choose the masking tape because it would let some light through which would create a cool effect this would also happen with the ruler too. With the ruler you would be able to see the scratches and other marks on the ruler. In image 1 which is the letter D I decided to use a highlighter and some tape, I tried this photogram twice as I did not put enough tape down on the first photo so all that appeared was the highlighter. In image 2 I though the highlighter looked very interesting and weird so I went into my backpack a got some small highlighter to create the brackets of the letter E. With the letter F I decided to keep with the highlighter theme. I also used a ruler as it looked really interesting in the photograms I had done before. All together I think the letters came out very successful and I was very pleased with the results.
Pinhole camera
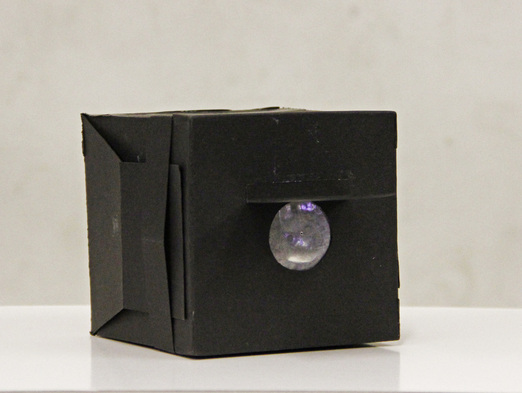
This is my pinhole camera I made, I have taken a few shots with it. At first all the photo's were blurry and not very good but then I changed the size of the hole to make it very small this made the quality of the images much better. So my photo's were not blurry anymore and I got a few good photo's looking out onto the school building.
How to make a pinhole camera.
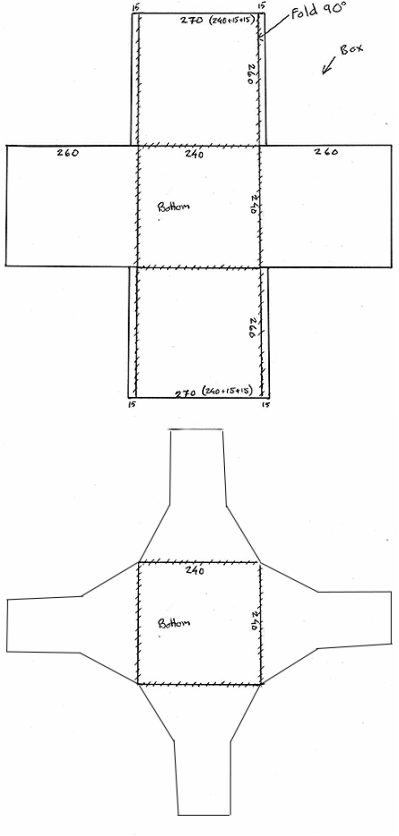
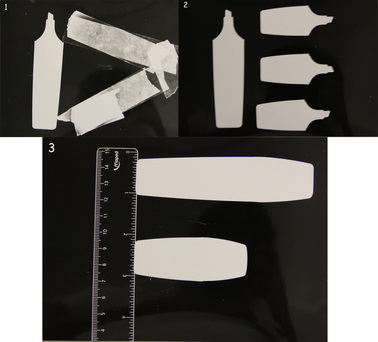
Step 1: cut out the template from card. Once you have cut out the template, bend the lines so you create a box with one missing side. This creates the main body for the camera.
Step 2: use tape and glue to hold the box together.
Step 3: cut out the other template. then bent the edges. this creates the opening to put the photographic paper.
Step 4: cut a hole out of the main box (with a diameter of about 2 cm) in the middle of the square. This will be where your hole will be so the light can get to the photographic paper.
Step 5: cut out a square of tin foil to put behind the hole you just cut out.
Step 6: using a pin, poke a very small hole in the middle of the tin foil.
Step 7: cut a 40cm by 2cm rectangle out of card this will hold the 2nd part of the camera in place.
Step 8: glue the2 ends of rectangle near the front of the camera so when you put the back of the camera on the edges will be able to slide through and keep the back in place.
Step 8: with the 2nd part of the camera glue one of the flaps into the main camera body.
step 9: make a small flap for the hole at the front of the camera so no light will get to the paper when your carrying it around trying to find the perfect shot.
Step 10: load up your pinhole camera and take some cool photo's!
Taking photo's with my pinhole camera

These are photo's I have taken with my pinhole camera, the one on the top left is the photo when you take the photo with the pinhole camera. It is a negative which needs to be inverted. You do this by placing the negative on top of a piece of photographic paper shiny sides together. Then you flash the photo. This inverts the photo and you get a positive photo show on the top right. Once you have a positive you can add effects such as the 2 bottom photo's. The bottom left is a positive photo which has been bleached and then toned. To make it look yellow. The one on the bottom right is a photo which has been put in blue toner. To make it have a blue effect.
My First Film
Developing the Film
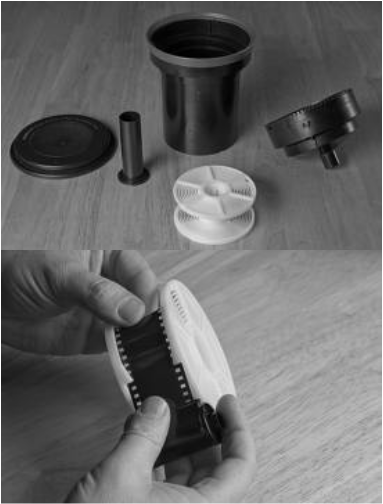
This is the equipment you will need to develop the film. After you have taken the photo's on the camera and reminded the film. You need to go into a completely dark room so it does not damage your film. once you in the dark room you need to crack open the film canister and roll the film into the spool. Then you place the spool into the bucket. After you have placed it in the bucket place the funnel and lock it in place. Then put the lid on the bucket. Then go and place the developer in the bucket and move it around so the developer get onto every part of the film. After the allotted time, pour the stop into the bucket to stop the film from developing. Then pour the fix to fix the image to the paper. Then pour water so the photo does not have any chemicals left on it.
First roll of film
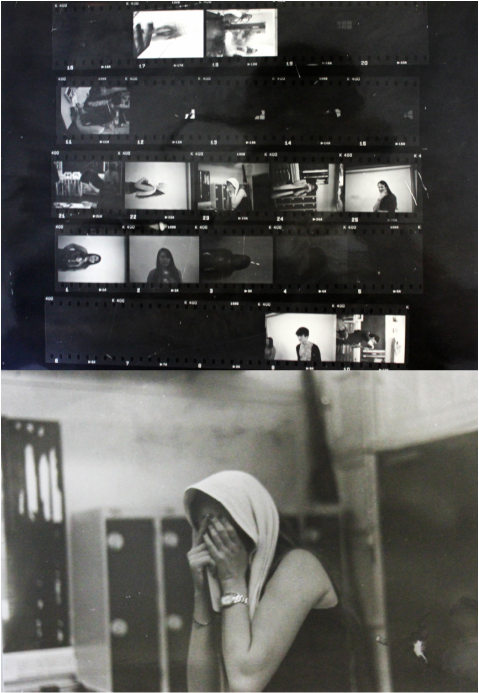
This is a contact sheet of my first roll of film, only a few photos are the correct exposure and therefore they don't come out clear. The contact sheet is a positive image of all the negatives on the film. This is helpful when you are deciding what photo to make a print form as you can see what it will turn out to be. This contact sheet is not very good as it is slightly cloudy, next time i should let the photo's stay in the chemicals for the actual amount of time. Also on my next roll of film i will try and get all the photo's on a correct exposure so i can use all the photos to make a print from.
This is a print from one of the good quality images that was taken with the first roll of film. To make a print of an image you need to place the negative in the transformer then you focus the image onto the piece of photographic paper with the filter on so you don't expose the paper. After you have focused it and have done a test strip to know long long to expose
the paper for. You are ready to do a print. I think this print is quite good it has allot of detail in the subject and the background it blurry and this makes the subject stand out even more. This image could be improved by leaving it in the chemicals for longer so the black become blacker so it has more contrast.
Using my second roll of film
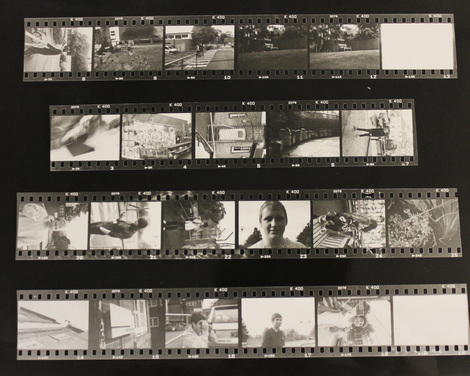
This is my contact sheet from the second roll of film i used in this roll of film you can see that almost all the images are the correct exposure and have come out, After looking and my contact sheet I choose to make a print of the darker photo of the bench and also the picture of the flower. I choose these photos because they have the correct exposure and look quite good.
First print from the second roll of film
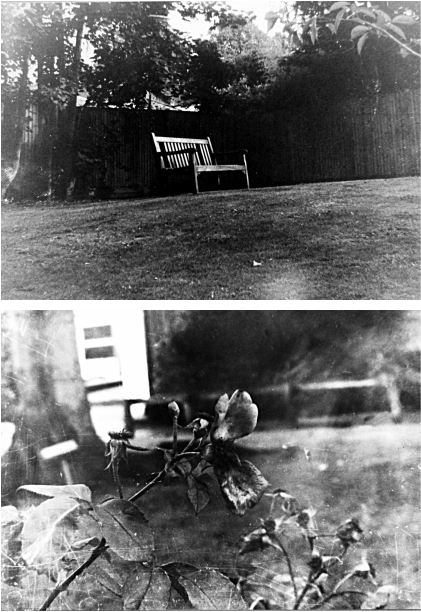
This is the first print i made from the film. I placed the film into the enlarger. And focused it with the magnifying glass. Then expose the paper for an amount of time. The place it in the chemicals and develop the print.
I took this photo as i thought it would look good and interesting as as bench is suppose to have people on, and this bench is empty and no one is their so it creates a spooky effect especially with the back and white and the small scratches. This photo is also very good because the contrast on the bench is very high and i think this looks really good.
This is another print i made from my second roll of film, i like this photo as it is quite light except the flower also it has a few scratches from when i was taking the image out of the chemicals. i think this gives the photo a really interesting effect as it looks aged and quite gloomy. The image it self it quite good as you have the flower in focus and the background has been blurred.
